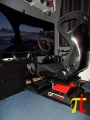
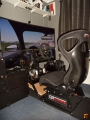
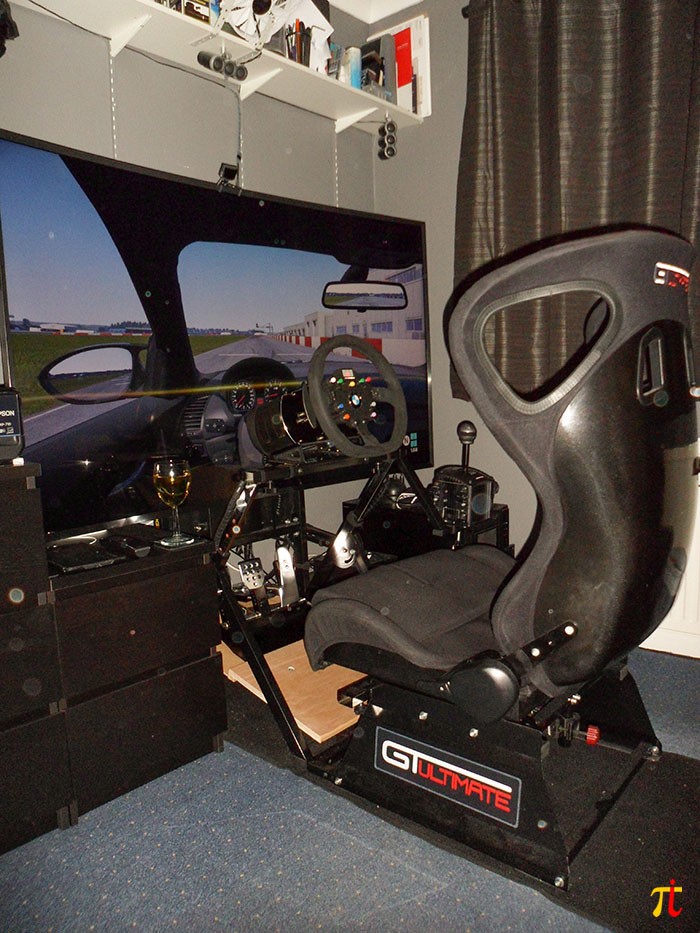
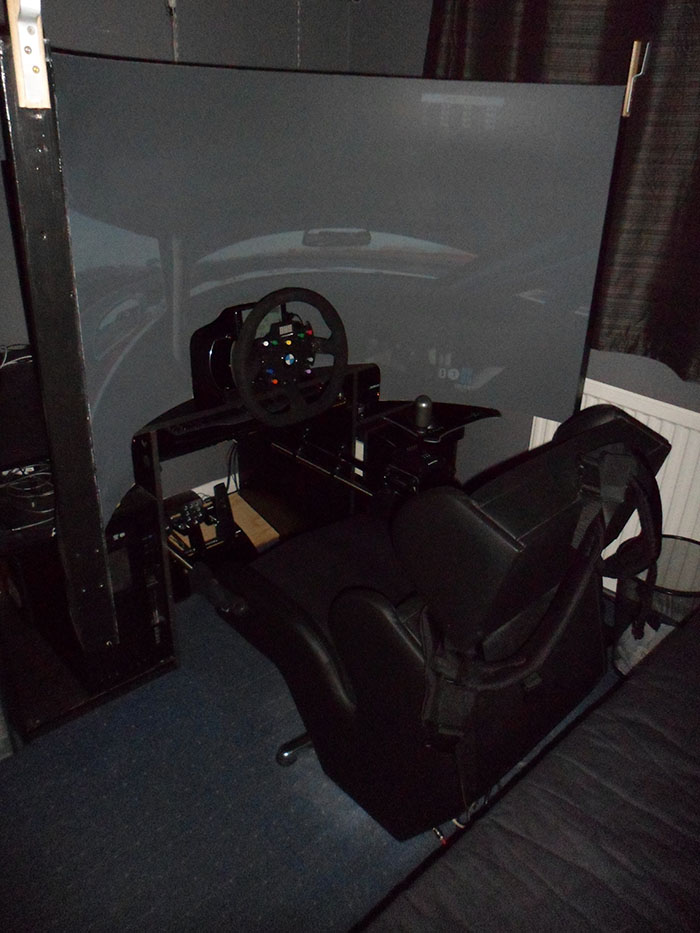
The (current) Rig...
| Cockpit/Rig: |
PC: |
- Next Level GTtrack Racing Cockpit
- Next Level Motion v3
- Fanatec Podium DD2
- Fanatec Porsche 918 RSR Rim
- Fanatec Universal Hub + 27cm Round Rim
- McLaren GT3 Rim
- F1 2019 Formula Rim/PPM
- Fanatec CSP v3i + 2x Dampers + Performance kit
- Fanatec CSS SQ v1.5
- Fanatec CS Handbrake
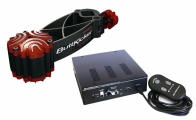
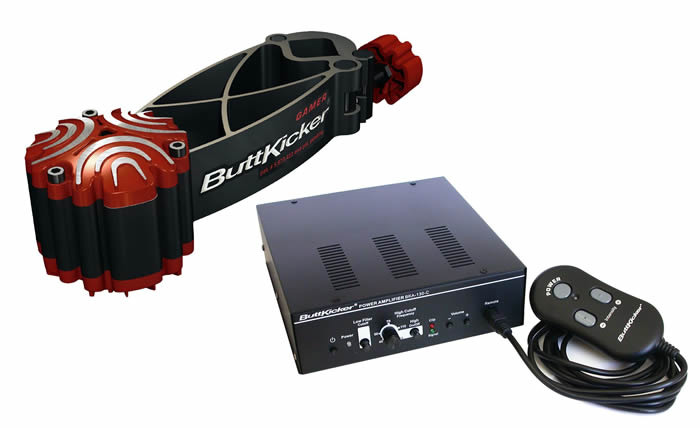
- Buttkicker Gamer 2
|
- Asus X99 Sabertooth
- Intel i7-5960X @ 4500Mhz
- 32GB DDR4 2666Mhz
- MSI RTX 2080 Ti @ 2050Mhz/11,200Mhz
- Creative X-Fi Titanium Fatal1ty Pro 5.1
- Onboard Realtek (for Simvibe)
- Samsung 951 M.2 drive for OS
- Samsung 860 Qvo for Games/Sims
- 360mm watercooled loop for CPU/GPU
- SuperFlower Leadex Platimun 850W PSU
|
| |
|
| Software: |
Screen: |
- Windows 10 x64 Pro
- MotionSystems ForceSeatPM
|
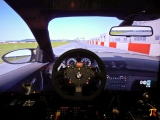
- Samsung UE65JU7500 65" Curved 4K TV
- Oculus Rift CV1
- Oculus Rift S
|
3rd April 2016
The Next Level Motion v2 review transcript from Ep. 4 of PixTV is here in full!
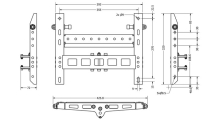
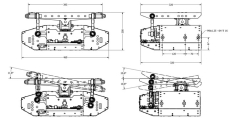
The compact unit shown in red here, is designed to fit under your racing seat and is a direct bolt on to the current and previous GT Ultimate seats from Next Level as you would expect. Of course you could fit this on your current rig as there are plenty of mounting holes that you could use to adapt seats from other manufacturers.
It’s a cinch to install and now I have fitted a couple of them, it takes less than 30 minutes to get you up and running. The unit weighs around 21Kgs on its own so it’s a bit of a handful, but it’s literally 10 bolts, 4 to the seat rails and 3 each side to firmly fix it to the included lowered side panels that have a rather nice laser cut out for the name. There is also an optional Buttkicker mounting post you can bolt on to the rear for added tactile feedback should you desire.
  |
The unit takes two cables at the front, one for the integrated power supply, direct from the mains, an IEC type that comes with a EU plug on the other end; the power draw is very low, less than a 1/4 of a KW and a USB 2.0 type ‘B’ socket that I have connected to a backwards compatible USB 3.0 from the motherboard, but the requirement is for a USB 2.0. The USB lead that is supplied is quite low quality and I found a lot of disconnects were being logged probably due to interference from the 101 other electronic devices I have in the cave, so I replaced it with a dual shielded ferrite bonded USB 2.0 cable and this has all but eradicated the disconnects. I had to do the same for my previous Motion solution, the Geko GS105 so it came as no surprise.
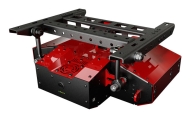 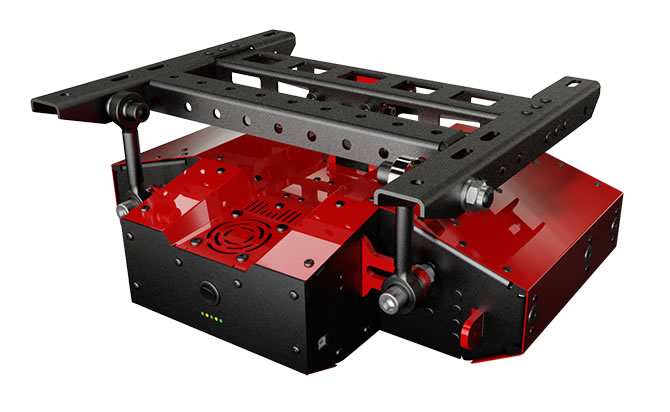 |
There are 2 motor driven arms at the front that facilitate the movement across 2 degrees of freedom (2DoF) about the universal joint situated on the top in the middle of the unit supporting the cradle which bolts on to your seat or seat rails if you have them. The unit moves 10° from the centre point, forwards, backwards, left and right at a maximum speed of 20° per second, which may sound quite slow, but going from one extremity to the other on an axis at this speed is very violent and something I personally don’t really want to experience whilst racing as it would probably mean I was headlong at speed in to a wall!
  |
I have a very quiet man-cave and even the PC is watercooled in a different room, well the garage downstairs actually and having had the Geko previously, which was almost silent in use and air cooled, I was surprised that the fan(s) touted as ‘silent’ in the marketing bumf by Next Level are actually the noisiest sound in the room when at rest, it’s about 50% louder than the fan on the CSW v2 when it kicks in to cool the wheel base, but it really is not noticeable when racing with the volume up to a normal level on the 5.1 system.
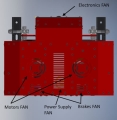 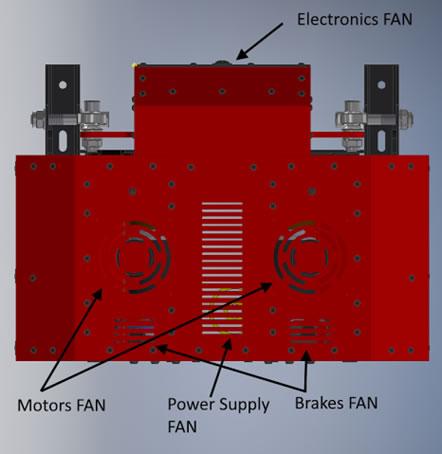 |
In fact, there are six fans in the Motion v2, five of which are on continuously, one to cool the electronics, and 1 each for the 2 motors and the associated electromagnetic brakes which lock in with a ‘clunk’ when you are paused to keep the chair from moving around, a great addition! The sixth fan is within the integrated power supply and only seems to come on when the unit gets warm. The motors themselves when moving the arms which manoeuvre the seat are much louder than the fans, but not as loud as I was expecting. They come in at about 80% of the volume of a Dbox setup and from the videos I have watched of actuator based motion rigs, both manufactured and DIY, the motors on the v2 seem to be much quieter than those alternatives on the whole.
As many of you know I’m a handy man and not adverse to DIY at all, but I am struggling for space and could not accommodate any long actuator struts behind the seat, so I really needed something that did not extend beyond the footprint of the seat and the Next Level Motion v2 does not disappoint in this regard, even with the Buttkicker Gamer 2 attached to the post at the rear. The software does transmit the tactile feedback from the racing sim to the chair itself, but I find having the Buttkicker in addition running from SimVibe greatly enhances the inbuilt feedback on the chair, it’s just something I have gotten used to and it’s a lot crisper than can be achieved by the ForceSeatPM software that the Motion v2 operates from. For instance the combined tactile feedback when braking with ABS or going over a rumble strip on a curb is superb as you get the simulated motion and the crispness of the shock through the seat of your pants or the clunk for a gear change alongside the surge in motion!
  |
The Software
The software, ForceSeatPM (Platform Manager) is created and maintained by MotionSystems EU in Poland along with the actual manufacture of the units themselves for Next Level Racing, they are a professional Motion Systems company with a wide reputation outside of the home arena.
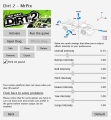
It is packaged with plugins and profiles for most of the current titles and also the capability for cloning and creating them yourself which you are encouraged to do so within the comprehensive user manual so that you can save any changes you make to the standard profiles.
The plugins sometimes require installation and the software either does this for you or guides you though it in an easy to follow fashion; no need for a degree in computer science here!
There are plenty of useful tools accessible directly from within the user interface such as the Action Center which will highlight any issues, configuration needs or software and firmware updates that need to be applied.
Once you have created your own profiles, you can start tuning them to your own needs. Most of them will require some tuning even if it is just one or two of the settings and this can be achieved by using the quick tunes menu to alter any of the 6 or so sliders or by going in depth and altering the figures directly at a more verbose level by clicking edit and it is here that you can limit the maximum speed of travel if you so wish along with how fast (or not) the start/stop ramps behave.
You can export and share your custom profiles to be imported and who knows, over time, Next Level may provide some sort of repository for the sharing of these, or even just a community forum, a facility that is lacking currently on their site, but it is early days for this platform.
Despite the 2DoF of the unit appearing to be those of roll and pitch, the other degrees of freedom are emulated via the software giving a much more rounded approach to the immersion. The overall intensity seems to control the extent of the movements across the 2 axis, whilst each of the effect intensity sliders control the individual contribution of that effect to the motion.
By default, the sliders are set to 1. This I suspect is the interpretation of the output from the sim by the scripts within ForceSeatPM at 1:1 to be emulated to produce the G-Force effect you would feel if you were driving a real car. You can go all the way down to 0.2 and up to 2.5 on each of these sliders so the variation is incredibly vast and you can tune it to your own taste once you get a grip on it.
The Park on pause option engages the two Electro-Magnetic Brakes whilst you are stationary to keep the seat perfectly still until you move the virtual vehicle. They are a fantastic addition and really do hold the motion platform rock solid, when the unit is powered off however, there are slight movements to be felt. The unit calibrates at power on each time to find its centre point, so it’s not a big issue.
There have been 3 updates in the last month to the original release of ForceSeatPM which shows that it is in continuous development and the fact that it is not only just the Next Level Motion v2 that it controls means that it should receive regular updates for a long time to come with new releases of racing, flying and home entertainment sims coming out.
I have created a profile for Automobilista using the Stock Car Extreme plugin, and added my own graphic and it works just fine and I think there are profiles for anything else I own from a racing perspective already in there, so I’m well covered.
Summary and Wrap up
In summary:
- The Next Level Motion v2 is compact and relatively quiet, it’s not totally silent though.
- It’s all contained within one unit, no external power supplies or control boxes are required so cabling is minimal and easily tidied out of the way.
- Side panels are included that are tailored for adding the unit to the Next Level GT Ultimate range of seats, but there are no rubber grips on the bottom so make sure you have it attached to the wheel stand to prevent slipping!
- Half an hour installation time to add to a Next Level rig! You need muscles though as it weighs a tonne, well 21Kgs, so reassuringly heavy and this shows how solid it is!
- Your whole body is moved to simulate the G-forces that would be applied to you if you were in a real vehicle, but the wheel, pedals and screen cannot be moved with this solution.
- Adaptation for your brain is instant, as soon as you start your brain gets it!
- Tactile feedback is already included and part of the solution through the 2 motors and 2 DoF and you can easily add a Buttkicker to the platform easily on the included post.
- It takes a while to understand what is what with the profiling software, and which effect controls which movements. It’s not always the obvious one! Speed, intensity of effects and extent of motion is fully customisable once you have grasped it!
- Some of the early firmware updates have needed the custom profiles to be started from scratch, which takes away the racing time. That said, things are now getting to the point where they are pretty good out of the box and only minor changes are needed to suit the person, vehicle and track for each title.
- ForceSeatPM is a simple software interface with half a dozen sliders that you can use for ease of adjustments once you grasp what each effect does and how it is interpreted by the platform.
- It could be argued that a DIY system is less than half the cost, which is great if you have a lot of engineering experience, can provide your own hardware support and want to use open source software the community itself supports AND have a lot of time to invest.
- The Next Level v2 comes with 2 years warranty in the EU, email based support, professional level software and you can be up and running in the time it would take to have a single GT3 race around Brands Hatch Indy!
So, thumbs up to Next Level Racing for developing this great platform with MotionSystems EU to deliver probably the most compact motion platform out there that will fit under most racing rig seats and increase the racers immersion instantly.
28th November 2015
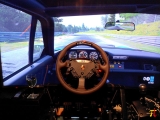
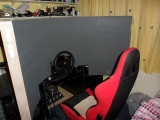
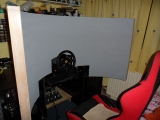
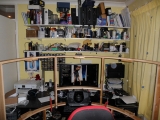
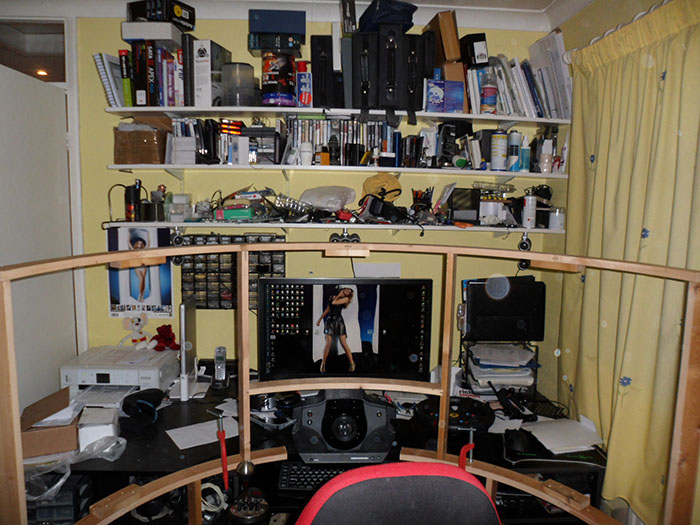
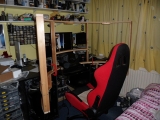
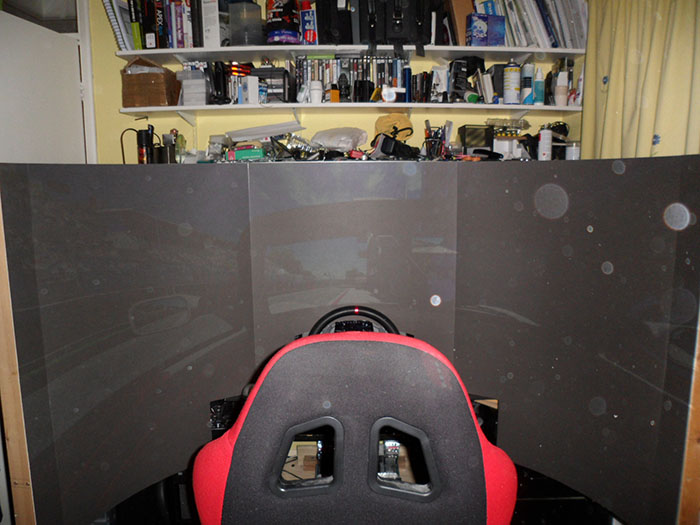
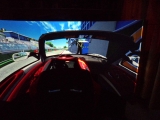
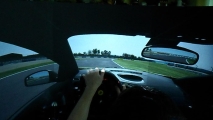
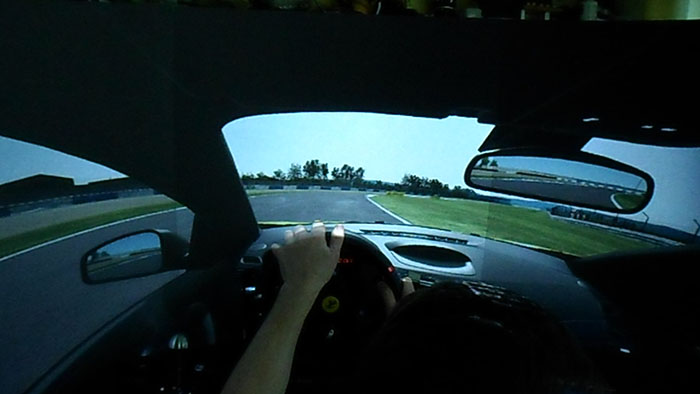
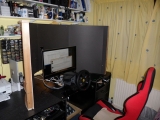
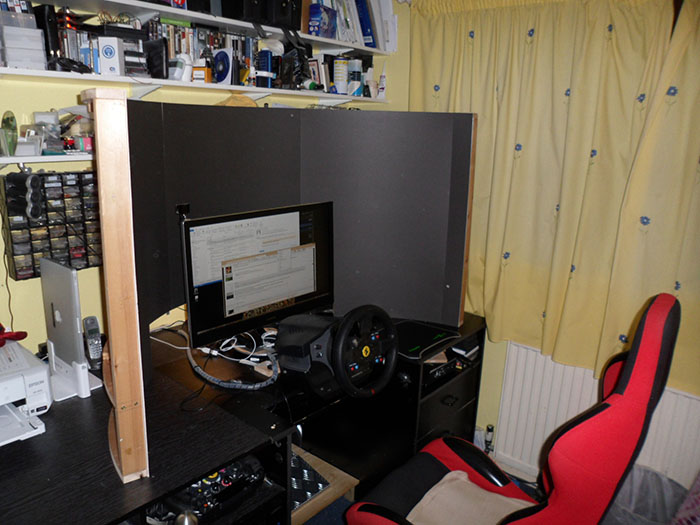
Well, it's been a while since I have posted on here, I have completely changed my setup... I'll update this section soon, but meanwhile... here's a few pics.
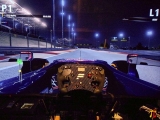
... and a few of the driver's eye view...
I'm just waiting for the motion part of the rig to arrive in September December January February 2016 and I'll be back racing and updating again.!
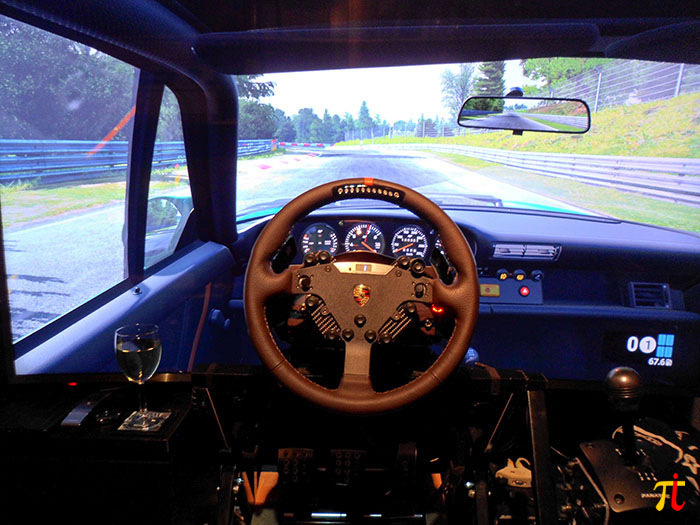
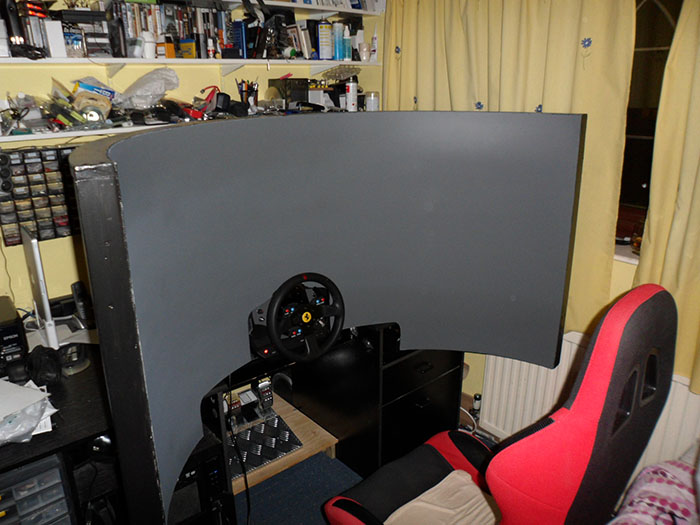
The Projection Screen...
20th July 2015
Note: I have now decommisioned the original Project Immersion projection screen and no longer have the PJ, but have left the information here for anyone that is interested in the project as it was.
13th July 2014
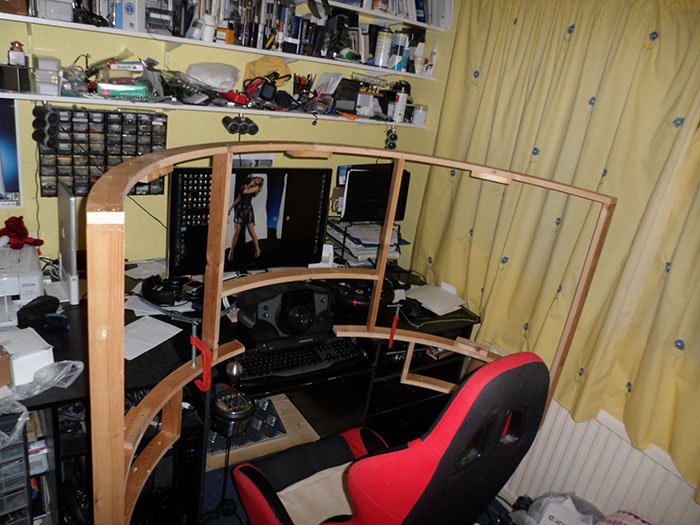
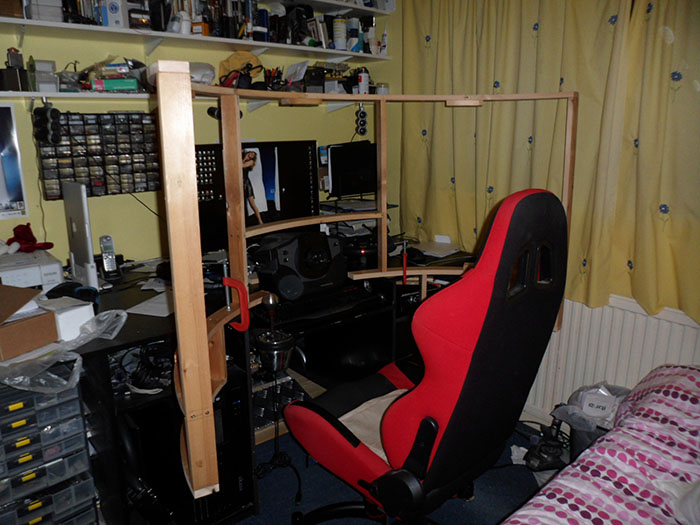
Design #2.....
I have had a few people round to look at the set up and a common themem had emerged... the screen was too close to the eyes to focus and get a clear picture!
I had thought of moving the screen further away, but this had all sorts challenges, not least I would have to make modifications to the frame and I was already on prototype #4!
I did a few mock ups and now that I have a motion chair, I am limited to how far back my chair would go. It worked out that I could have my chair go back about 6" maximum before it hit the bed/sofa.... so 6" was my target. I kept the screen and PJ in the same places, but moved my wheel away from the screen by 6". I had to modify the desk top by turning it around to get a square edge and filling the cutout with a slice off my keyboard draw, but it has worked out a treat and it definitrely makes a world of difference. I thought initially I would lose some of the immersion because the wheel and myself were not as close to the screen, but it has had no effect on that at all, if anything as the screen is more in focus and that bit firther away, the picture looks sharper to my eyes and therefore my immersion has stepped up once more!
  |
It's worked out really well, with my chair about 6" further back than before my eyes at center position are now 26.5" away from the screen, which matches the radius of the curvature! My head shadow is also a couple of inches lower so doesn't cover up the screen when my chair launches me forward under braking... Perfect!
There is a 1" gap above the wheel base now on the cutout of the screen, but I'm seeing how it goes, if it doesn't annoy me (it's not projection space anyhow as my head shadow covers it) I'll leave it as is, if it does I'll work on filling it in and smoothing over, or if I upgrade my wheel, then I'll need to address the screen gap....
11th April 2014
Prototype #4.....
I am now on version 4 of the screen and am a super dooper happy bunny.
I realised that the screen was set too low and to get my real wheel in line with the onscreen wheel, I had to introduce between 4° and 7° of negative tilt in pCARS and ALL other sims to get anywhere near alignment.
Whilst this was great to start with, it started to grate with me as I delete all my profile settings every build in pCARs specifically.. which meant farting around with tilt (ctrl+k & numpad arrows) every day. This soon became a chore.. so I measured up where my screen needed to be and went out and got me another 8' x 4' piece of hardboard and re-invented the frame to suit an uplift of 65mm.
As a point of reference, the virtual steering wheel center for a 21:9 aspect ratio and vertical FOV of 74° is 25% up the screen from the bottom.
I took the opportunity of rounding some corners too to make it more friendly in appearance.
Aesthetically, it looked like a novice DIY project from the back, so I painted it a satin black.
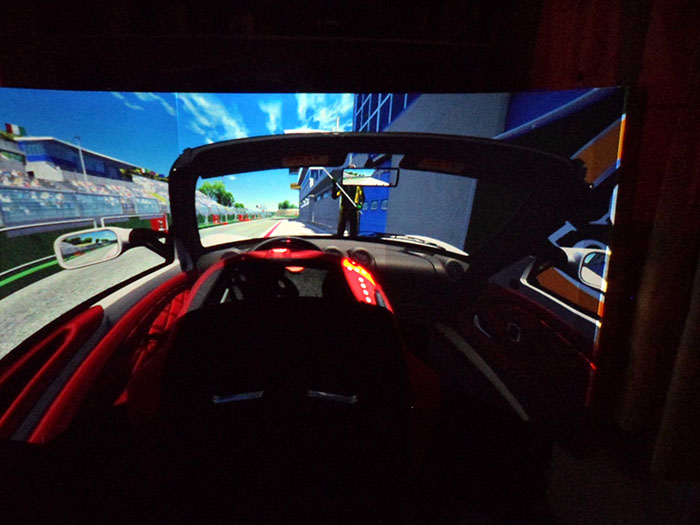
All I can say is WOW! Immersion and then some achieved! I had THE moment last night that I have read about... that moment where sim meets reality.. the WOW moment of getting FOV, seat position, pitch and perspective all in one place.. I increased world movement to 100% and...
I have my own dash - Leo Bodnar's SLI-Pro (as shown in the vids for the GT and F458 rims) and integrated for the F1 rim, therefore purposely have a cut out of the screen so I can see that through my wheel for the GT and the 458 rims, or on my wheel when I use the F1 rim as the way I have designed it, my head blocks most of projected image in that area.
I could have mounted the PJ higher and had the screen further away from the wheel so that the dash was projected behind the wheel, but having already invested previously in dash's of my own, I wanted to get best use out of them. It allows me to sit more upright too and takes away the reflections from the wheel... so it's a win win situation for me. Also to note is that you want to get the PJ as horizontal as possible so as not to have to use any KeyStone correction on the PJ image... pixel distortion gets compounded greatly as the image has to be warped for the curved screen already.
You could argue that you wanted to see the in-car dash for more authenticity, which as I said I could have achieved if I had that goal, but I just didn't and having taken all the shadows and seat positions and comfort and view in to consideration, I feel I have the best compromise for me.
24th February 2014
Prototype #3.....>
I got some ArtFX dark grey spray paint from Halfords... the tin states: 'Super Matt Effect' ... and looks about N4-N5 on the tin.... but in reality, it's about N2-N3 and way too dark... apart from that... it's SATIN finish and reflects everything everywhere.... I returned both cans and got a refund the next day for this reason.... I had only painted a test piece, not the screen...luckily!
So my quest continued and I found a Mid-Dark grey Matt spray paint from Plasti-kote a.k.a. Valspar in stock at B&Q. I bought 2 cans, did a test on a scrap piece, all looked fine and about N5, so perfect.... and began to spray the screen. The 1st can gave up when I was half way up the screen and the second can gave up on the third time I pressed the nozzle.... so I jumped in the car and took them back and got the replacements (with new style/design nozzles that were 'clog free').
I used 1 full can (and the half can that gave up) and the screen looks great.
There are a few imperfections, but I don't notice when the projected image is on it. I'm saving the other can for a touch up... just in case. I've let the paint harden now for a few days and it's a much tougher finish than the primer. It's still N5 too, which is where I was aiming and I have now calibrated the projector to the screen... again. The whites look white and the blacks are awesome with the room darkened. I've fitted a black out blind to the window, which stops most of the light, but not all for day use.
Here is the new colour of the screen:
...and an action video...
13th February 2014
Prototype #2.....
I was not happy with the seams, I may have well just kept the triple monitors... I wanted a seamless display.... and the N3 grey was a little too dark and a tad too shiny. It needs to be as flat matt as possible for a clear picture and as smooth as a mirror as can be.
I decided that once cut to shape/size, the 3mm hardboard would be of handleable weight and besides, I had already bought it so had nothing to lose. I carefully removed the mounting board from the frame and used it as a template to draw around on the rough side of the hardboard and then cut the shape out. I attached it to the frame with EvoStick Serious Stuff Ultimate strength adhesive from one of those tube gun dispenser thingymajigs and held it in place with 8 carefully placed G-Clamps for 24hours to ensure a good bond as there would be quite a lot of tension on the curved surface and didn't want it pinging off while I was going round Silverstone!
I wasn't happy as it was just too bright and the image was burning out all over the place in my lineof sight and I couldn't get the blacks to be black which spoiled the immersion and made it feel gimmicky ... not the feeling I wanted to have at all.
On top of that it was too reflective as it was too light. I was going for neutral grey, between N5 - N7 and this was really between N8 and N9 when applied.
2nd February 2014
Design #1.....
I had some rather tight requirements:
- The wheel and seating position is fixed and cannot be moved due to the office desk. There is already a 22" x 6" cut out as shown for the wheel in the desk.
-
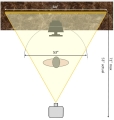
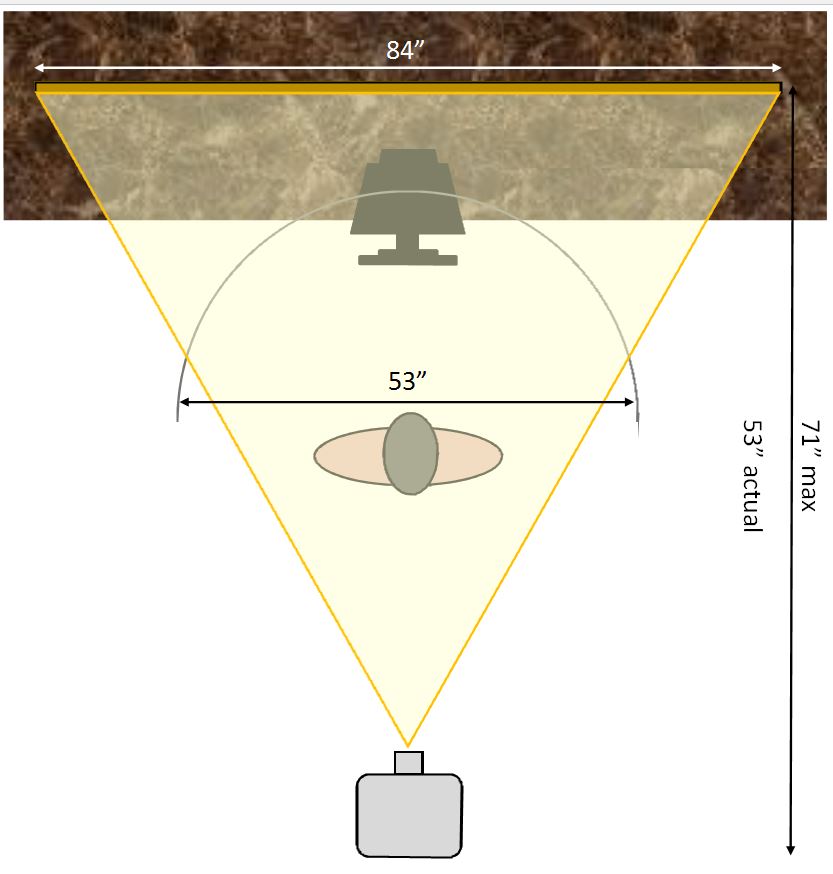
Due to the small room I work/play in... the projector must be 71" max away from the screen to sit on the opposite wall behind me.
-
The screen must fit in front of the existing monitor - in the illustration, the base of my 27" monitor would touch the back of the 86" orange line (which could also represent a portable flat screen for watching films)
-
The screen must be able to be picked up and put further back behind the existing monitor I use as a primary monitor when not in use.
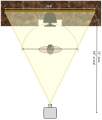
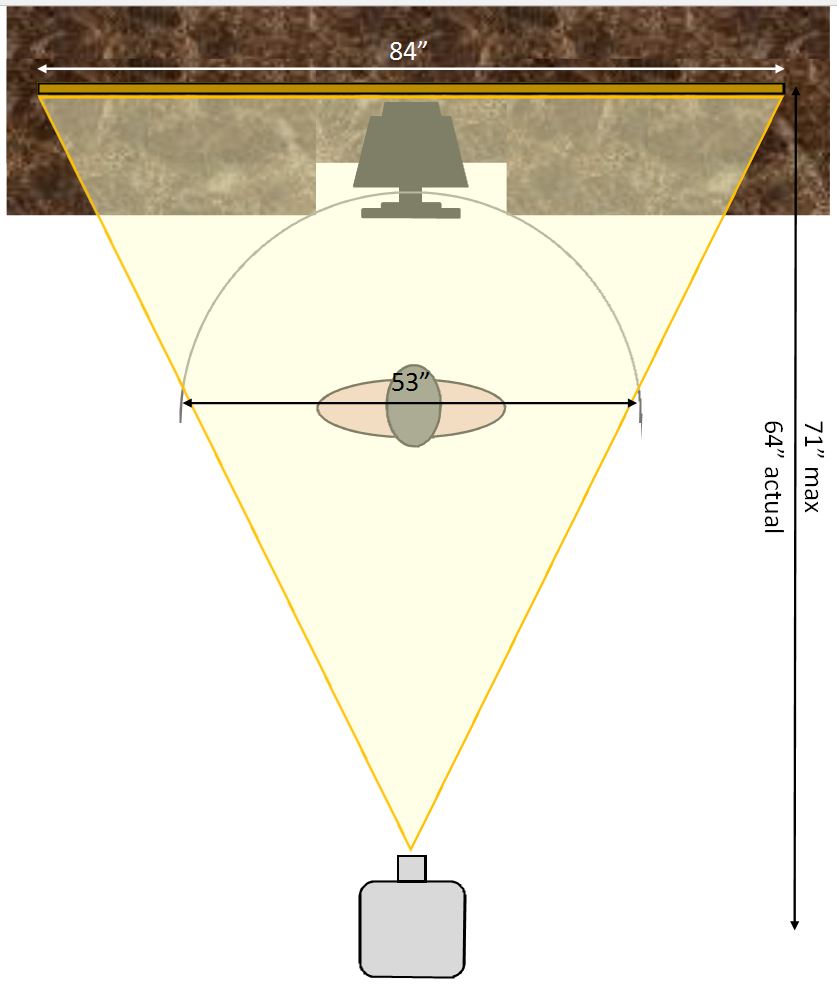
I worked out the projection angles and tried to get a 1:1 view and the projected size came out at 77" x 33". At about 166°, this works at my chosen radius of 26 1/2"
I decided that I would I place the center of the curved screen in line with the body of the T500RS and project on to it at 21:9 ratio for a 84" projection at 64" distance from the PJ with 33" max screen height.
2nd February 2014
Prototype #1.....
I built the curved support frame out of recycled 3/4" x 4 1/2" x 5' bed slats from a futon base that I had replaced recently.
I made a template (I printed the rectangle from the above plan onto 2x A4 sheet, cut them out and taped them together) and constructed a jig to use with my router to cut them into arc pieces of a 26.5" internal radius and a 2" depth for strength.
I got 2 arcs from each bed slat approx. 23" in length and fixed them together with biscuit joints and wood glue end to end to make the full arcs required.
I used some of the spare pieces to strengthen the joints and wood glued them together along with some 1 1/4" wood screws to pull them into place. Some of the 90° joints are in grooves, some just butted against each other.
There is no excuse for the mess, I'm a hoarder and it will all come in handy one day, just like the bed slats did
The whole structure is held to my desk by 2 thumb screws accessible either side of the keyboard drawer. You can just see the captive nut in the frame at the bottom.
I have not got room for a rig or racing chassis and I needed to be able to lift the screen when not in use over to the back of the monitor so I can work and play ArmA3 etc on my 27" screen so it needed to be light.
I need to keep the screen light and portable and liftable over the monitor for day use and other gaming, hence using the type of wood I have used (and the fact it was effectively free/recycled).
  |
I had already purchased the hardboard (a.k.a Masonite) and it's pretty darn heavy... it was fun getting the 8' x 4' sheet (cut down to 78" x 37" in store) in my wife's Nissan Micra (alone I may add) and I got a round of applause from onlookers when it was in, stowed behind the seats and in an 's' shape with all doors and the boot (trunk) shut and me in the front ready to drive away... it was easy getting it out, I just opened the boot and it sprang out at me. It is easy to cut though and retain it's shape on the frame, which is another important criteria. I did think of a polycarbonate sheet, at about 1.5mm thick, but cutting out the bit for the wheel and desk without splitting it when bending it could be tricky, the slightest overcut and it would just crack all the way up. It's too big to thermoform, which would be the ideal solution.... but getting paint to be hardy enough to withstand knocks on such an impermeable surface would be a challenge without keying the surface... and that would then require more coats of paint... and Polycarbonate isn't cheap either... could be an expensive experiment if it didn't work out.
The screen would be too white if I bought/used a projection screen... I'm only 22" away from it at the furthest point and my eyes would fry!. I have considered the N5 Grey rear/front projection material, but it's very expensive and I'd have to mount it or carpet spray glue it to something perfectly flat as the frame is just that, a frame, but flimsy material will not keep the shape without a supportive backing.
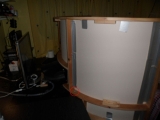
I found some 2mm mounting boards in a dark N3 Neutral Grey at a hobby/craft supplies shop and these seemed to be a perfect fit at 33"x 23". I stuck them to the frame with doublesided sellotape.
They look like they are not curved around the frame, but it's an optical illusion caused by light reflection. Their vertical edges have been cut using a guillotine and have compressed a little, and when butted to each other there is a tiny seagull (in flight) shaped depression which is exaggerated by light bouncing all different ways off it. If I used them again, I would make my own very careful knife cut on the edges to get rid of it, but the chances of me and my clumsy hands getting that right are very low. On the upside, the boards are extremely light though. You can see the seems reflecting the image as brighter bands of light.
I have calibrated the projector since taking the early photos and it's a lot better now....
The Projector...
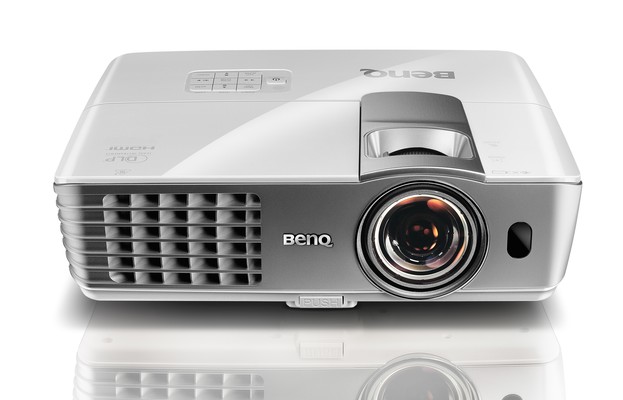
BenQ W1080ST.....
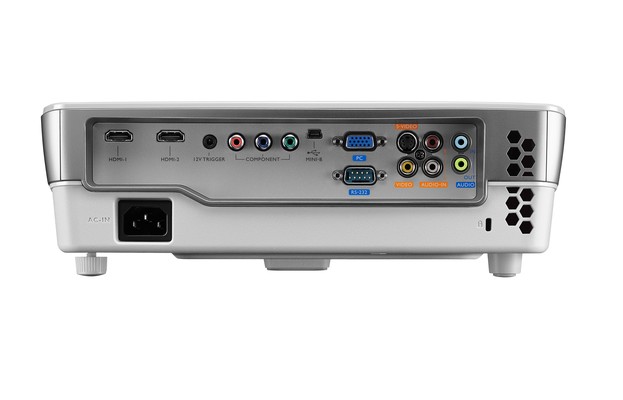
The 3D capable, full HD projector (BenQ W1080ST) is running a resolution @ 21:9 (Ultra widescreen), originally @ 1920x822 pixels (see 'downsampling' for update). This was important to me as other SuperFOV setups I have seen have been at standard HD 1920x1080 and for me, there is too much picture top and bottom and it makes the whole thing too big in my opinion (other opinions are available etc etc).
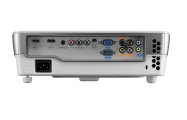
There are plenty of connectivity options on the back and I'm using a good quality HDMI 1.4a 5 meter long cable as the original cable was not good enough quality to cover that distance and only gave me 30 fps at 1080p.
Pixel density is obviously quite poor compared to a monitor, but I'm getting used to it and the immersion actually tricks your brain anyway.
Placement.....
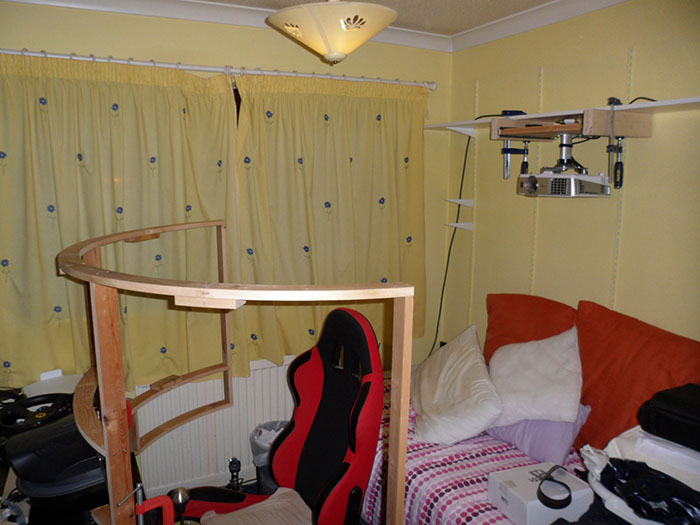
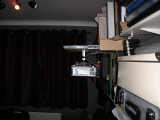
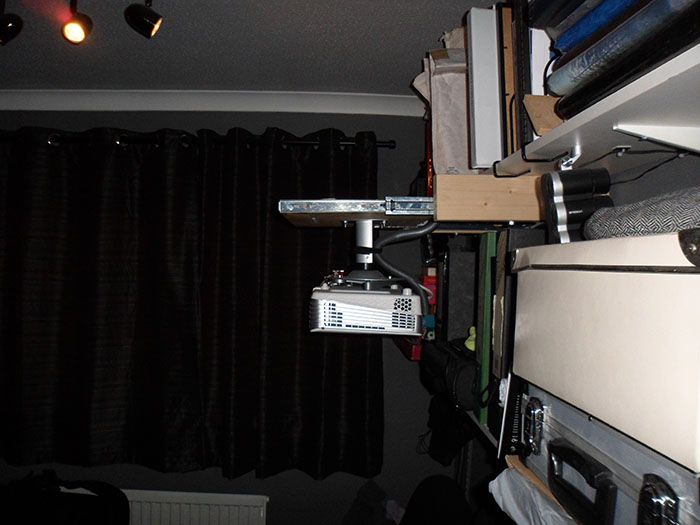
Space, in the room I have available for racing, is limited so I mounted the PJ under a shelf on sliding drawer rails, the sturdy type as it has some weight to hold up when extended.
I can slide it back to under the shelf when not in use so that it doesn't get bumped. The rails also alow me to get the picture exactly lined up much easier without having to alter the optical zoom 1.0 - 1.2x).
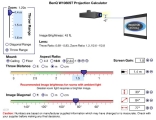
To get the throw, I used this calculator.
I set the ratio to 1:2.34 (close to 21:9) and set the image diagonal to 84" to give me a screen height of 33" and width (around the circumference) of 77". This game me a range to work to of between 53" @1.2x zoom and 64" at no zoom.
The PJ needs to be level and perpendicular to the screen to reduce distortion of the picture generated through 'keystone correction'.
The Picture...
The Warping Software.....
The warping software I have settled on is Immersive Display Pro by Fly ELISE-ng and I have had tremendous support from the developer, Nikola, and also from Brad @ Nthusim too, but Immersive Display Pro won the battle for me on price and support levels by far. It's not perfect, but it's not that far off it :)
Downsampling.....
I was not overly pleased with overall picture quality as it was still quite blurry and lacked detail and I put this down to a combination of vertical resolution, pixel size and warping software causing the distortion and the grey screen...... but I was wrong!
Until now I have been using an aspect mode called 'letter box' on the projector. From the manual:
Letter Box: Scales a picture to fit the projector’s native resolution in its horizontal width and resize the picture’s height to the 3/4 of the projection width. This may produce a picture greater in height than can be displayed, so part of the picture is lost (not displayed) along the top and bottom edges of the projection. This is suitable for the display of movies which are presented in letter box format (with black bars on the top and bottom).
I'd also been projecting to the furthest point between PJ and screen, thinking that this was the best way. I changed this recently and pulled the PJ closer to the screen and started to target the closest part (the edges) as my projection target. Whilst it's all in the theory and uses a slightly different algorithm for calculating the PJ's throw distance, it's basically the same set up wise. The interesting thing is that it actually has some fringe benefits. I was losing quite a lot of the picture at the bottom of each side in a triangle shape and this is now dramatically reduced.
Back to the point of this update though.. I was looking at Project Cars and there is a graphics option for antialiasing that uses DownSampling, and various different modes 2x, 4x, 6x and 9x and it produces quite nice results on a normal screen and I have been using DS4x. Basically the render engine 'paints' the picture behind the scenes at a much higher resolution so for small far away objects, instead of them being 3 or 4 pixels wide and high, they are 2x or more that amount then down sampled to the best fitting pixels that represent this higher detail but in a smaller physical space on the screen.
Downsampling is explained much better on this website: http://www.neogaf.com/forum/showthread.php?t=509076 and it also shows you how to do it.
I fiddled with the settings but the option to downsample on the GPU was not there, only Display was available. Still, it turns out that the PJ I have is quite happy with doing the downsampling given a compatable resolution. I already sent a custom resolution (1920x822) to the PJ with a 21:9 aspect to match the 21:9 curved screen, so I thought I would keep this aspect and see how high I could I could go before the PJ refused to output a signal.... I tried the equivalent to Project Cars' DS4x (2x H, 2x W) - 3840x1644 but all I got was a blank screen so I went down to 2560x1098 and this worked and looked pretty good, but I thought I'd try to go higher and went to 3200x1372... it looked even better... so I kept going and the final resolution I got to is 3360x1440 and it looks smashing.
As the PJ was doing the downsampling, I pushed the limits and upped the output to 1920x1080 rather than the 1920x822 I was using and then magnifying using Letter Box mode and set the mode to Auto.... I recalibrated the warping software and presto... even more clarity. Where blurry lines were, detail seems to exist to the point it's almost too sharp as the pixels are still nigh on 1mm² so I can see the 'jaggies', but the crispness and soo much extra detail outweigh the downside easily.
Dashboard...
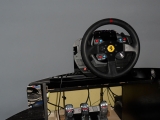
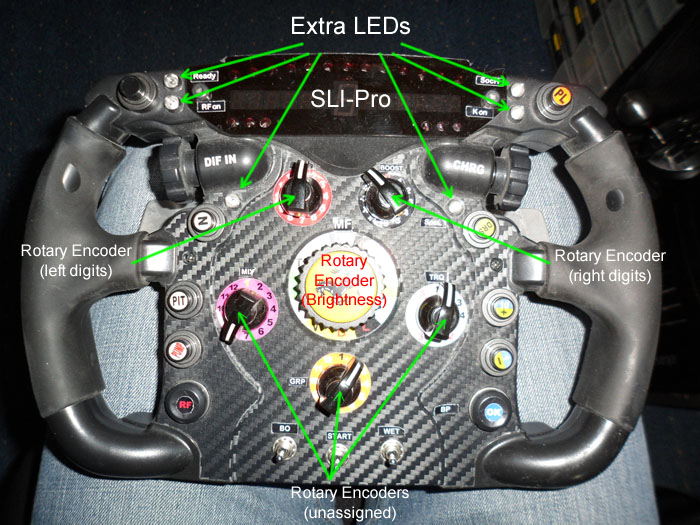
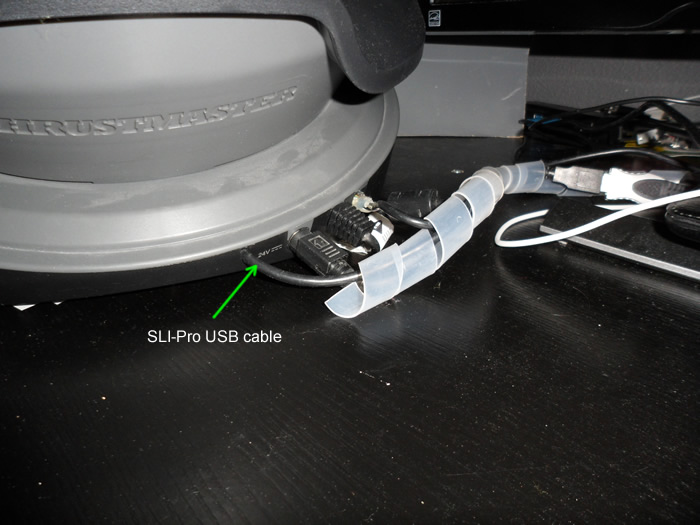
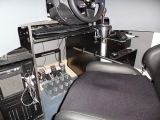
I have been using Leo Bodnar's products for many years along with EKSimRacing's SLIMax Manager software, so it made perfect sense to add the digital dashboards to my Thrustmaster wheels and rims. I hated that most implementations I had seen involved having coiled USB cables trailing from the rim to a USB port so had to come up with something to suit both my GT style rims and the F1 rim.
I tried various methods of connection, most of which were not sustainable as my Rim collection expanded as I would need too many SLI-Pro units to accomodate them all if I mounted them all on the rims, so I had to have at least 1 of the SLI-Pro modules on the wheel base itself. I could not find a solution for a mini 10 way din to replace the existing one and even if I had, it would mean altering every rim probably.
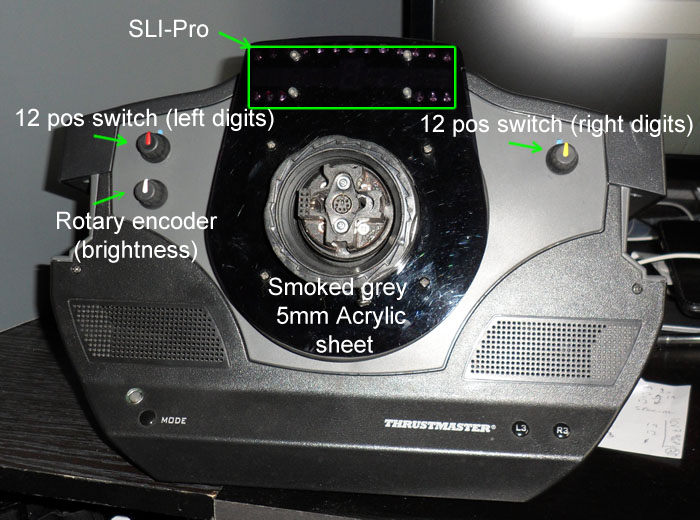
SLI-Pro Mounted on the T500RS wheel base.....
I never got on that well with the static paddles of the T500RS and frankly they got in the way when the F1 rim was attached. Once I had also purchased the GTE 458 Addon rim I had no real need for the paddles. This was a blessing in disguise as it opened up the possibility of removing the static paddles and putting a plate around the TM Quick Release hub to hold the SLI-Pro using the 4x fixing holes already on the wheel base.
This allowed me to route a USB cable inside the body of the T500RS wheel base unit. There is loads of room inside, so it was an easy task.
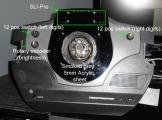
I made a mount for the SLI-Pro using some 4mm acrylic in smoked grey with fixing holes where the paddle mounts used to be.
Whilst I was inside the wheel base, I added a couple of 12-position switches to control the left and right sets of digits on the SLI-Pro and a rotary encoder so that I can control the brightness of the display itself.
The top was formed to the same shape as the top of the wheel base and the flat cables are just slipped under the rubber dust gaitor at the top.
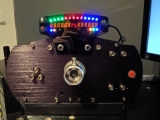
SLI-Pro Mounted on the F1 Addon Rim.....
With my hatred of coiled USB cables external to the wheels/bases, I had to have an integrated solution for the F1 rim that would connect to the wheel inside the Thrustmaster QR hub. I tried various prototypes that ultimately gave up on me over time one by one, until I came across the rock solid reliable solution that I use today.
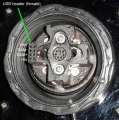
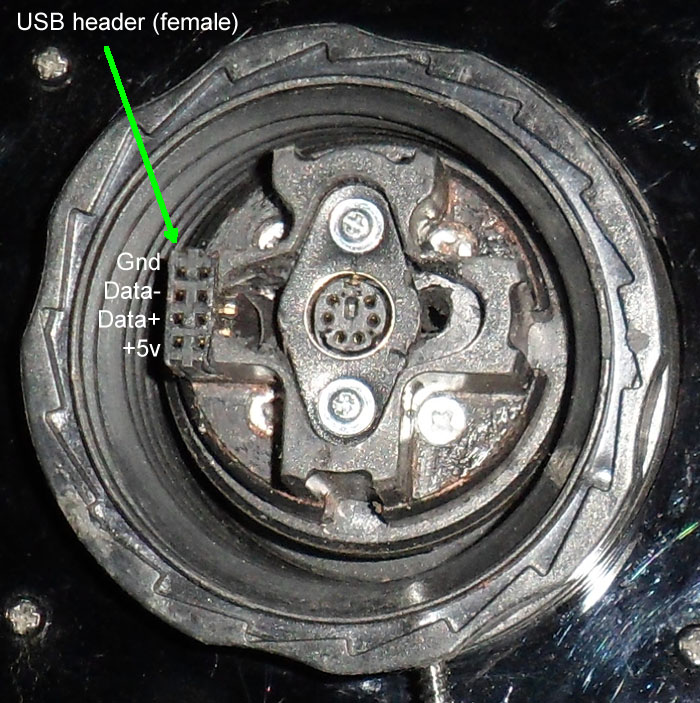
I routed a coiled USB cable through the center of the wheel hub along with the standard coiled cable that connects to the 6 pin din plug that is used for the wheel's electronics and carefully used a Dremmel to remove some of the hard plastic on the hub center to make room for a 8 pin DIL header. This would give me a bit of redundancy if one of the pins broke having 2 pins/sockets per connection (USB has 4 connections, +5v, Gnd, Data + & Data -). It wasn't as tricky as I had thought as the header I used was exactly the right size (once I had filed it down to match the size hub spigot on the left)
I had to match the position carefully with the F1 rim to make sure it all aligned and as luck would have it the male part of the header was easy to match, so with the aid of the Dremmel once more, I removed enough material from the back of the QR hub on the F1 rim to sit the header perfectly.
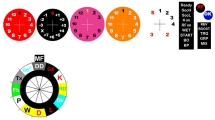
Once this was in place, I just had to wire it up to the SLI-Pro I had fitted in the F1 Addon rim, the extra LEDs and the encoders that I had put in place of the faux knobs on the original tin plate.
I drew up some dials to reflect the original look and printed them on self adhesive vinyl sheet, then cut them out with a circle cutter (great bit of kit, like a pair of compasses, but with a blade not a pencil).
You can download them full size here, just print at 100% on to A4.
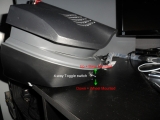
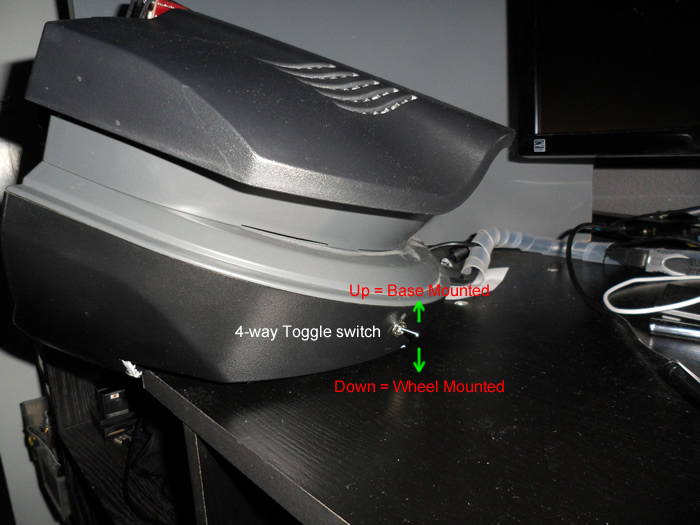
Rather than have 2 USB cables coming out the back of the wheel, I opted for a 4-way switch....
... and a single cable to switch beteen Wheel Base mounted and Rim mounted modules.
SLI-Pro Mounted on the Fanatec CSW wheel base.....
With each Fanatec rim already having a minimal display (compared to what I am used to with the SLI-Pro display, it wasn't long before I made a mount out of the 4mm smoked acrylic sheet I had left over.
It was easy to fix to the base as there are already some M6 threaded holes for accessories, so I made use of the top 2.
I have added 3 rotary encoders, 2 on the left for Left Digit control and Brightness and also a single one on the right of the display. They have a push button functioon on them as well, so I have 3 extra buttons now too.
SLIMax Manager Software.....
Of course these SLI-Pro modules only come to life with well developed software and EKSimRacing Software came to my rescue. Whilst there are other pieces of software available, Zappadoc has always provided me with an an excellent service, often having a fix to a problem within a few hours of me reporting it. He has also gone way past the extra mile with sorting other issues out in a flash. For instance, with Codies games, there is a single telemery output, configurable for a single device. The SimXperience software, Sim Commander 3 only allows itself and forwarding to one other device so I would have to choose dashboard or motion with that, and that sucks big time. I reported the limitation to Zappadoc and within an hour or so, he had created a feature on his Codemasters Proxy software to allow as many devices as you can think of, with any version of Codies API (selectable per device/port). This allows me to swap the ports about with both the SLIMax Manager software and also the Geko software for the seat. Perfect!
The software is probably the most configurable piece of genius I have ever come across outside of the corporate world, where application costs thousands of pounds, but this is a few quid per device and free for some devices! There are loads of options out of the box and plugins for just about every sim on the planet and if you want to customise anaything, Zappadoc is ther to help you woth scripts and the like to get exactly what you like. He is also open to suggestions and feature requests.
I'm probably moving over to Fanatec gear in the near future so initially will be using the SLIMax Manager software with that kit before I work out a mounting system for the SLI-Pro's on the new stuff.... if I feel a need to that is.
Tactile Feedback...
23rd January 2013
ButtKicker Gamer 2.....
Many moons ago I purchased a ButtKicker Gamer 2 to add to my adapted office chair/bucket seat. I spilt the subwoofer output from my Creative sound card and used it as it came.
I thought it was pretty good and definitely added to immersion... until a menu screen came up or the title screen with bassy music and it rattled the base of the seat more than it did in game. I soon got frustrated.
SimVibe.....

I came across SimVibe by SimXperience when it was announced and after umming and arring for a month or two about the price, I grabbed a copy.
You need a dedicated sound card, for the software to work, so I just enabled the onboard sound and set it to quadraphonic. This works well and allows me to stilll get the great sound from the Creative Xfi in 5.1 for most sims/games.

My experience was trasformed by SimVibe and level of immersion went up dramatically. It's so configurable but is also great out of the box for most titles. I needed to do a bit of tweaking as I don't install sims/games on the same drive as the OS, so the default paths are different, but that's just expected in my book and is a shame the software does not query the registry for the install path.
There are a few leagacy titles that are not supported currently by SimCommander 3 (the current 'mothership' program that is host to SimVibe) such as GTL, Race, GTR and GTR2 etc but I believe that Sim Commander 4 will suport them. Whether there will be a upgrade fee or whether the product will be full price to existing owners of SimVibe, I'm not sure, but the website does state that the update will be free to existing SimXperience product owners and SimVibe is listed under Products > Software.. so hopefully will be gratis to me.
...hide
Motion...
The next obvious edition to my project was some form of motion. I had tried a dbox solution out at Codies HQ in October 2013 during a communtiy feedback day for their GRID Autosport title prior to it's launch and actually suffered whiplash the next day. I knew I wanted Motion simulation after that, but not at the cost of my already tired neck (I had a nasty accident some 20 years ago that left me with a neck not as good as it could be).
I have not got the space (or the money) for a full motion simulator from the many available out there and I also had concerns that I would be thrown about a lot and with my neck to consider, it really wasn't an option, so I had a choice:
- build one myself from some components or starter kits,
- look for something that would work for me in the space I have available
15th February 2016
Next Level Motion v2
... coming soon... review of the Next Level Motion v2 newly aquired
21st April 2014
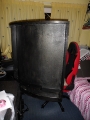
GS-105C.....
It didn't take long and I came across the GS-105C from Geko Systems. It would double up as an office chair for non simracing use as it has a swivel base and it fitted in the space I had between the desk and the bed/sofa AND just as important, didn't throw my whole body about in the process of simulating G-Forces.

Quote from Geko Systems website:
"Based on a new concept, the GS-105 is the first motion simulator to provide immediate, strong, sustained, high definition forces the driver can intuitively use to handle a vehicle, without any parasitic force.
Two strong and highly reactive electric actuators are enclosed in the upholstered seat, to provide up to 40 lbs g-forces updated 250 times per second."
I did some homework, found some existing customers and asked some questions and a week later, it was agreed with SWMBO, that I could order it for my birthday. After a brief negotion with Julian at Geko Systems, the order went through and a few weeks later the chair arrived by UPS.
It didn't take long to assemble and get in place. Those with eagle eyes will notice I redecorated the room before the chair arrived (- no more yellow!). I chose a projector freindly colour scheme of mid grey to math the screen with a matt appearance and a light grey ceiling.
The padding on the seatbase is too thin for me to be comfortable past 1 hour, so I got hold of a AIROSPRING AS100 Pressure relief cushion, usually used on wheelchairs. It fits perfectly and reduces the sweating whilst providing a comfortable seat for both racing and office use. Ideal!
The next step was to add the ButtKicker Gamer 2 to the stalk of the chair, route the wires for that and the power and usb cable for the chair to the back of my desk and all was installed bar the G-Seat Manager control software. I have tried the seat without the ButtKicker and to be quite frank, it needs it. Without you just don't get the vibrations kicking your butt. I guess if I had not had the BK Gamer 2 to start with, I would not miss it, but I have had it for a year or two and enjoy the seat of the pants kick in, it just adds to the immersion.
As you can see, the construction of the GS-105 is from course chipboard, with PU Leather upholstery, but don't let that put you off. It's very solid and constructed well and should withstand all but falling off a forklift truck from a great height during transit... but thats another story!
I hit my first real problem shortly after getting going. The swivel chair swivels!.. I know I know... Who'd have thought it? ...but when I was resisting the forces as I was instructed by Julien categorically, and you have to to get the immersive feel, I easily got bent out of shape and ended up at an angle to the wheel and screen... not good! Of course there is a static model of the GS-105 available for attaching to racing rigs too, which does not have this challenge.
I
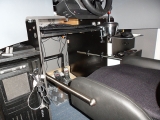
realised that by some strange magic, the GS-105C is about 60mm slimmer than the gap under my desk. I quickly raided the garage and looked through all the stuff I could recycle (you know, the stuff that's been kept aside as it may be useful one day that the missus wants rid of and out of the way all the while!). I came across an old shower curtail rail, 25mm in diameter and some 25mm pipe clips.... I cut it in half and mounted it to the inside of the desk void... the result... 2 stabilising bars that prevent seat rotation!
... and because I can slide the poles in an out, it turns the seat back in to an easy access piece of furniture when necessary!
With all the structural stuff out of the way, I could now full enjoy the motion provided by the seat. It is awesome and fits the bill fantatsically. It took a few hours to program my brain to accept the pressure vs G-Force conundrum though, but now it just feels so natural and I don't give it a second thought.
I'm talking about the way the seat applies G-Force to the upper torso. It's opposite direction pressure to what is felt IRL.... but the G-Force is the same as in real life. For example, when going round a sharp left hander, the G-Force of the movement throw your body to the right. IRL, you feel pressure on your right hand side, as you are pushed in to the seat on that side. ... BUT with the GS105, the upper Torso is pulled to the right by the upper backrest, which applies pressure to the left hand side of the body (edit: if you don't have the straps setup right/tight).. so you move in the direction of the G-Force correctly, but for the first few laps or so, the feeling of the opposite expected pressure is quite alien (edit: now I have set up the straps correctly, this is no longre a valid comment).
The trick of course is to resist the movement (simulated G-Force). If in a real car you were thrown to the right, your natural instict is to pull your body back to the left to get your body straight. when you do this, the pressure on the right is relieved and you are back in the middle of the seat and most times feel pressure on the left as you push your body the opposite way to the G-Force.
With the GS-105, as it throws you to the right, you resist and so you are already at the relieved pressure on the rightand already have the pressure on the left... it's just slightly out of sequence (NOTE, not lag as all effects are instant, but order of events via proprioception - the unconscious perception of movement and spatial orientation arising from stimuli within the body itself - just as with any motion rig), but I soon adapted to the new feelings and now it feels normal.
I say normal... after a session of an hour I am tired out, 2 hours and I'm done for. This seat makes the experience so much more immersive than I ever imagined.
The very versatile G-Seat Manager software is great out of the box, but also allows what seems to be hundreds of fine tuning options per profile and a Sim/Game can have as many profiles as you can imagine.
If I had to summarise the experience after the last 8 weeks of having it in a single word, it would be AWESOME!