
Field Of View in DiRT Rally.... and how to set it up!
Updated: 5th May 2016
-
FOV Adjustment type: Vertical
- FOV Ajustment method: In-game slider OR File Manipulation
- FOV Value Unit: ° multiplied by 2
Since earlier than the release date, Codies have made the FOV slider work over a range between 0.0 and 1.0, not very descriptive one must admit! This seems to equate to 30° to 70° vFOV. For some this will be good enough to use with 0.5 being close to 50° and each increment in between being about 4°.
For those FOV purists however, there is a way to change the vertical FOV and the 'eye' position in relation to the origin point that is hard coded in game. DiRT Rally is a Hor+ game, so once you have set the vertical FOV it does not matter whether you have 1 or more screens, the FOV value remains the same, so these instructions apply to anyone that wants to alter their field of view that has a (large) single screen or has either Nvidia Surround with 3 screens or AMD Eyefinity with 3 screens, 5 screens or 6 screens.
To note: if you have a single screen, you can still use this guide to setup your FOV as this is a Hor+ game, the FOV is the same for 1 and 3 screens (and 5 screens for that matter) if you have them side by side. Just use the "3x1" option for a single screen setup.
One thing to note is that somewhere deep in Codies source code for DiRT Rally, they have miscalculated the values taken from the editable files and you have to put in double the FOV angle to get the right picture. The value from the FOV Calculator is already doubled for DiRT Rally so you can use that figure without having to do any of the maths.
There are 2 files that you need to locate and alter to override the in-game FOV.
- <Documents>\My Games\DiRT Rally\hardwaresettings\hardware_settings_config.xml
- <Steam>\SteamApps\common\DiRT Rally\cars\generics\eyefinity_cameras_adjustments.xml
Once you have located the above files, you can open them with Wordpad (rather than notepad) and change the values. You need to work with BOTH files to make this work out for you.
Make sure you DO NOT have DiRT Rally running while editing these files!
Open 'hardware_settings_config.xml' with Wordpad and locate the following line:
<eyefinity force="" osd="" />
If you have 3 screens side by side in Landscape or a single screen then you probably want to use the following value:
<eyefinity force="3x1" osd="" />
The "3x1" represents the screen layout. See the picture below for current supported options for this value:
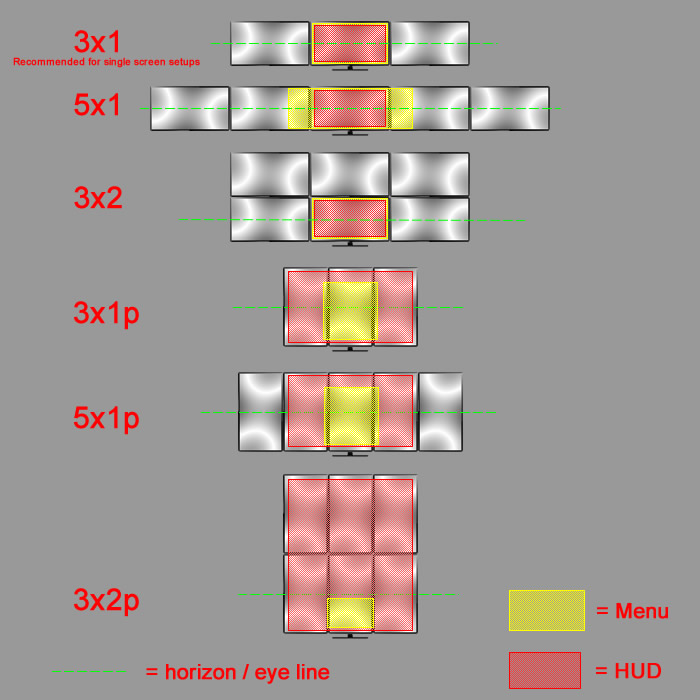
By setting this value, you are overiding the in-game cameras and FOV. Save the file, you're done with it now.
Open 'eyefinity_cameras_adjustments.xml' with Wordpad and locate the following section:
<CameraAdjustment class="Head">
<Fov angle="70" />
<Tilt percent="100" />
<Position x="0.0" y="0.0" z="30.0" />
</CameraAdjustment>
The 'Head' camera adjustments have the following parameters applyable to it's viewport:
- Fov : type float : the angle that describes the field of view of the camera.
- 70 is default and represents approx 35° vFOV (see note above), use the value from the FOV Calculator here directly or maybe add a little more if it suits you better.
- Tilt percent : the percentage of tilt to be applyed to the camera position. (100 = look to the near horizon, 50 = looking slightly up and further in to the distance.
- Position : type vector3 : the camera source position offset percentage, added to the original camera source position.
- X : left and right, I found no need to tweak this parameter.
- Y : Up and down. Positive numbers move your virtual eyes upwards towards the top of the windscreen, negative move them downwards towards the bottom of the windscreen.
- Z : The greater the number, the further back your eyes will be. I found 100 to be about level with the middle of my brain, so too far back for me and my setup, but if your eyes are actually forwards of you monitors, it may be perfect for you.
Save the file and go check out your new FOV in DiRT Rally (you'll need to restart DiRT Rally each time you make a change to the file). I tend to add up to 5° to most FOV settings in most games as it feels just that little bit better than the mathematical FOV from the FOV Calculator, so for DiRT Rally, I just add 10 to the number. Im my case my Mathematical Vertical FOV is 61°, so the calculator comes out with 122 for DiRT Rally, I add 10 to that to give me the 5° extra.
Here's my camera settings that I use for Cockpit view just for reference:
<CameraAdjustment class="Head">
<Fov angle="132" />
<Tilt percent="50" />
<Position x="0.0" y="3.0" z="30.0" />
</CameraAdjustment>

Field Of View in GRID AutoSport.... and how to set it up!
- FOV Adjustment type: Vertical
- FOV Ajustment method: File Manipulation
- FOV Value Unit: ° multiplied by 2
There is a way to change the vertical FOV and the 'eye' position in relation to the origin point that is hard coded in game. GRID AutoSport is a Hor+ game, so once you have set the vertical FOV it does not matter whether you have 1 or more screens, the FOV value remains the same, so these instructions apply to anyone that wants to alter their field of view that has a single screen or has either Nvidia Surround with 3 screens or AMD Eyefinity with 3 screens, 5 screens or 6 screens.
To note: if you have a single screen, you can still use this guide to setup your FOV as this is a Hor+ game, the FOV is the same for 1 and 3 screens (and 5 screens for that matter) if you have them side by side. Just use the "3x1" option for a single screen setup.
One thing to note is that somewhere deep in Codies source code for GRID AutoSport, they have miscalculated the values taken from the editable files and you have to put in double the FOV angle to get the right picture. The value from the FOV Calculator is already doubled for GRID AutoSport so you can use that figure without having to do any of the maths.
There are 2 files that you need to locate and alter to override the in-game FOV.
- <Documents>\My Games\GRID Autosport\hardwaresettings\hardware_settings_config.xml
- <Steam>\SteamApps\common\GRID Autosport\cars\generics\eyefinity_cameras_adjustments.xml
Once you have located the above files, you can open them with Wordpad (rather than notepad) and change the values. You need to work with BOTH files to make this work out for you.
Make sure you DO NOT have GRID AutoSport running while editing these files!
Open 'hardware_settings_config.xml' with Wordpad and locate the following line:
<eyefinity force="" osd="" />
If you have 3 screens side by side in Landscape or a single screen then you probably want to use the following value:
<eyefinity force="3x1" osd="" />
The "3x1" represents the screen layout. See the picture below for current supported options for this value:

By setting this value, you are overiding the in-game cameras and FOV. Save the file, you're done with it now.
Open 'eyefinity_cameras_adjustments.xml' with Wordpad and locate the following section:
<CameraAdjustment class="Head">
<Fov angle="70" />
<Tilt percent="100" />
<Position x="0.0" y="0.0" z="30.0" />
</CameraAdjustment>
The 'Head' camera adjustments have the following parameters applyable to it's viewport:
- Fov : type float : the angle that describes the field of view of the camera.
- 70 is default and represents approx 35° vFOV (see note above), use the value from the FOV Calculator here directly or maybe add a little more if it suits you better.
- Tilt percent : the percentage of tilt to be applyed to the camera position. (100 = look to the near horizon, 50 = looking slightly up and further in to the distance.
- Position : type vector3 : the camera source position offset percentage, added to the original camera source position.
- X : left and right, I found no need to tweak this parameter.
- Y : Up and down. Positive numbers move your virtual eyes upwards towards the top of the windscreen, negative move them downwards towards the bottom of the windscreen.
- Z : The greater the number, the further back your eyes will be. I found 100 to be about level with the middle of my brain, so too far back for me and my setup, but if your eyes are actually forwards of you monitors, it may be perfect for you.
Save the file and go check out your new FOV in GRID AutoSport (you'll need to restart GRID AutoSport each time you make a change to the file). I tend to add up to 5° to most FOV settings in most games as it feels just that little bit better than the mathematical FOV from the FOV Calculator, so for GRID AutoSport, I just add 10 to the number. Im my case my Mathematical Vertical FOV is 61°, so the calculator comes out with 122 for GRID AutoSport, I add 10 to that to give me the 5° extra.
Here's my camera settings that I use for Cockpit view just for reference:
<CameraAdjustment class="Head">
<Fov angle="132" />
<Tilt percent="50" />
<Position x="0.0" y="3.0" z="30.0" />
</CameraAdjustment>

Field Of View in Project Cars.... and how to set it up!
- FOV Adjustment type: Horizontal
- FOV Ajustment method: in-menu and in-game adjustment options
- FOV Value Unit: °
Project Cars is a bit of an oddball when it comes to adjusting FOV as it is Vertical+ game which means that the adjustable FOV is Horizontal. This means that the FOV value will be different depending on how wide your monitor is and/or how many monitors you have side by side.
You can calculate the mathematically correct value with the FOV Calculator and use this directly in game. Be sure to choose the correct ratio for your screen(s) and whether you have 1 or 3 of them though!
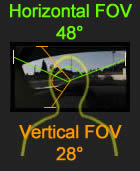
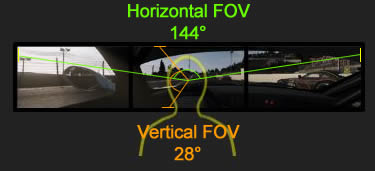
You will notice in the example below that the Horizontal FOV changes by adding horizontal real estate, where as the vertical FOV does not alter at all.
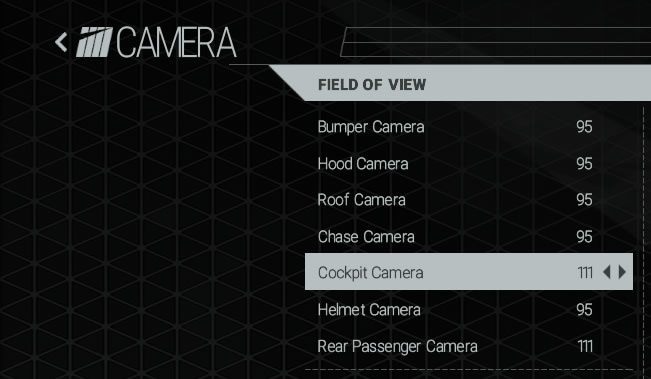
To alter the FOV for Cockpit View you need to follow the simple process while in game at the first menu screen:
- Choose Options and Help
- Choose Camera
- Choose the Field of View panel (selected by default)
- use the < > to the right of the Cockpit Camera value to change the FOV to match the value you have calculated.
As with most sims/games, I like to add between 5° and 10° to the final figures to make it feel right for me.
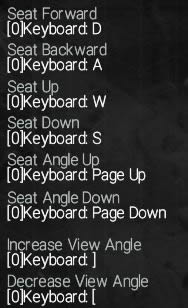
There is fantastic seat/eye position adjustment in Project Cars, you can move the seat up and down and also forwards and backwards if you map keys to this function. Also you can map keys to increase and decrease the FOV whilst in game and probably the most brilliant feature is the head tilt (seat angle up and seat angle down) to make the horizon appear where you expect it to in relation to how you are actually sat in your real seat.
Here's how I have mine setup for reference so I can get the view just right whilst sat in the vehicle.
My Field Of View in Sims/Games....
My new rig/screen has the following spec:
- Screen Qty: Single
- Screen Type: 4K Curved TV Screen with a 165" (420cm) radius
- Screen Diagonal: 65" (165cm)
- Screen Width: 56.3" (143cm)
- Screen Height: 32.2" (84cm)
- Screen Ratio: 16:9
- Distance from eyes to screen: 27" (68.5cm)
- Mathematical vFOV: 61°
- Mathematical hFOV: 93°
- Eye height /Horizon on screen: 16" (40.5cm)
My old rig/screen is well documented on this website, but in summary:
- Screen Qty: Single
- Screen Type: Projection, Curved to an arc of 166° on a 26.5" (67.5cm) radius
- Screen Diagonal: 84" (213cm)
- Screen Width: 77" (195cm)
- Screen Height: 33" (84cm)
- Screen Ratio: 21:9
- Distance from eyes to screen: 26.5" (67.5cm)
- Mathematical vFOV: 64°
- Mathematical hFOV: 111°
- Eye height /Horizon on screen: 16" (40.5cm)
Remember, sometimes the mathematical FOV is a great start and what we should be aiming to get to if our systems allow us, but it's not cast in stone and should only be a guide. Use a value that feels right to you, it may differ across games and sims but that's just how it is, all games/sims are written slightly different and the eye point origin may differ greatly not only between games and sims, but car to car too.

Field Of View in Sims/Games.... and how to set them up!
There is no game here with an ID of GAS


